Spring学习

Spring概述
IOC 控制反转
IOC: Inversion of Control(控制反转)
控制反转:将对象的创建权反转给(交给)Spring。
Spring的开发包: spring-framework-4.2.4.RELEASE

- docs :Spring的开发规范和API
- libs :Spring的开发的jar和源码
- schema :Spring的配置文件的约束
需要导入的包:

创建对象
Spring通过工厂+反射的方式创建对象
实例:
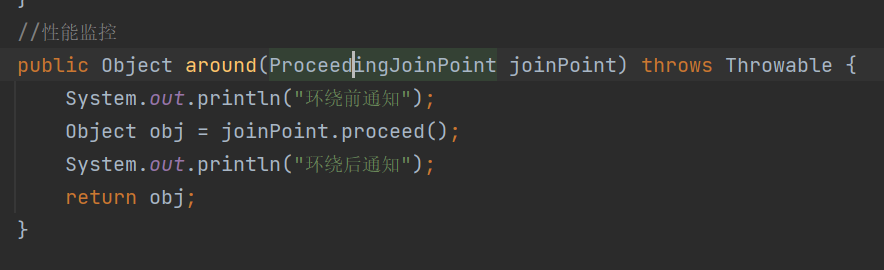
public void demo2(){
ApplicationContext applicationContext = new ClassPathXmlApplicationContext("application.xml");
UserService userService = (UserService) applicationContext.getBean("UserService");
userService.save();
}
<beans xmlns="http://www.springframework.org/schema/beans" xmlns:xsi="http://www.w3.org/2001/XMLSchema-instance" xsi:schemalocation="
http://www.springframework.org/schema/beans http://www.springframework.org/schema/beans/spring-beans.xsd
http://www.springframework.org/schema/beans ">
<!-- spring 入门配置-->
<bean name="UserService" class="com.pure.spring.demo1.UserServiceImpl"> </bean>
</beans>
IOC和DI
- IOC:控制反转,将对象的创建权反转给了Spring。
- DI:依赖注入,前提必须有IOC的环境,Spring管理这个类的时候将类的依赖的属性注入(设置)进来。
Bean的相关配置
- id :使用了约束中的唯一约束。里面不能出现特殊字符的。
- name :没有使用约束中的唯一约束(理论上可以出现重复的,但是实际开发不能出现的)。里面可以出现特殊字符。
Bean的生命周期的配置
- init-method :Bean被初始化的时候执行的方法
- destroy-method :Bean被销毁的时候执行的方法(Bean是单例创建,工厂关闭)
Bean的作用范围的配置
- scope :Bean的作用范围
- singleton :默认的,Spring会采用单例模式创建这个对象。
- prototype :多例模式。(Struts2和Spring整合一定会用到)
- request :应用在web项目中,Spring创建这个类以后,将这个类存入到request范围中。
- session :应用在web项目中,Spring创建这个类以后,将这个类存入到session范围中。
- globalsession :应用在web项目中,必须在porlet环境下使用。但是如果没有这种环境,相对于session。
Bean属性注入的方式

有参构造属性注入
/**
* @author:index
* @date:2021/12/7
* 有参构造属性注入
*/
public class Car {
private String name;
private Double price;
@Override
public String toString() {
return "Car{" +
"name='" + name + '\'' +
", price=" + price +
'}';
}
public Car(String name, Double price) {
this.name = name;
this.price = price;
}
}
<!-- 构造方法的方式 -->
<bean id="Car" class="com.pure.spring.demo4.Car">
<constructor-arg name="name" value="宝马">
<constructor-arg name="price" value="3000">
</constructor-arg></constructor-arg></bean>
public void demo1(){
ApplicationContext applicationContext =new ClassPathXmlApplicationContext("application.xml");
Car car = (Car) applicationContext.getBean("Car");
System.out.println(car);
}
set方法属性注入
/**
* @author:index
* @date:2021/12/8
* set方法属性注入
*/
public class Car2 {
private String name;
private double price;
@Override
public String toString() {
return "Car2{" +
"name='" + name + '\'' +
", price=" + price +
'}';
}
public void setName(String name) {
this.name = name;
}
public void setPrice(double price) {
this.price = price;
}
}
<bean id="Car2" class="com.pure.spring.demo4.Car2">
<property name="name" value="宝驴"></property>
<property name="price" value="2000"></property>
</bean>
public void demo2(){
ApplicationContext applicationContext = new ClassPathXmlApplicationContext("application.xml");
Car2 car = (Car2) applicationContext.getBean("Car2");
System.out.println(car);
}
set方法注入对象类型的属性
/**
* @author:index
* @date:2021/12/8
* set方法注入对象类型的属性
*/
public class Emloyee {
private String name;
private Car2 car2;
@Override
public String toString() {
return "Emloyee{" +
"name='" + name + '\'' +
", car2=" + car2 +
'}';
}
public void setName(String name) {
this.name = name;
}
public void setCar2(Car2 car2) {
this.car2 = car2;
}
}
<bean id="Emloyee" class="com.pure.spring.demo4.Emloyee">
<!-- value:设置普通类型的值,ref:设置其他的类的id或name-->
<property name="name" value="老王"></property>
<property name="Car2" ref="Car2"></property>
</bean>
public void demo3(){
ApplicationContext applicationContext = new ClassPathXmlApplicationContext("application.xml");
Emloyee emloyee = (Emloyee) applicationContext.getBean("Emloyee");
System.out.println(emloyee);
}
名称空间的属性注入(spring2.5)
- 通过引入p名称空间完成属性的注入:
- 写法:
- 普通属性 p:属性名=”值”
- 对象属性 p:属性名-ref=”值”
- 写法:
P名称空间的引入
使用p名称空间
</bean>
<bean id="Emloyee" class="com.pure.spring.demo4.Emloyee" p:name="老李" p:car2-ref="Car2">
</bean>
SpEL属性注入 (Spring3.0以后)
- SpEL:Spring Expression Language,Spring的表达式语言。
- 语法:
- #{SpEL}
- 语法:
<property name="name" value="#{'三蹦子'}"></property>
<property name="price" value="#{5000}"></property>
</bean>
<property name="name" value="#{'老沈'}"></property>
<property name="Car2" value="#{Car2}"></property>
</bean>
调用方法
<property name="name" value="#{CarInfo.name}"></property>
<property name="price" value="#{CarInfo.calcPrice()}"></property>
</bean>
<bean id="Emloyee" class="com.pure.spring.demo4.Emloyee">
<property name="name" value="#{'老沈'}"></property>
<property name="Car2" value="#{Car2}"></property>
</bean>
<bean id="CarInfo" class="com.pure.spring.demo4.CarInfo">
</bean>
集合类型属性注入
<bean id="CollectionBean" class="com.pure.spring.demo5.CollectionBean">
<property name="arrs">
<list>
<value>张三</value>
<value>李四</value>
</list>
</property>
<!-- 注入list集合-->
<property name="list">
<list>
<value>王五</value>
<value>赵六</value>
</list>
</property>
<!-- 注入set集合-->
<property name="set">
<set>
<value>老王1</value>
<value>老王2</value>
</set>
</property>
<!-- 注入Map集合-->
<property name="map">
<map>
<entry key="aaa" value="a"/>
<entry key="bbb" value="b"/>
<entry key="ccc" value="c"/>
</map>
</property>
public void demo1(){
ApplicationContext applicationContext = new ClassPathXmlApplicationContext("application.xml");
CollectionBean collectionBean = (CollectionBean) applicationContext.getBean("CollectionBean");
System.out.println(collectionBean);
}
分模块配置
在加载配置文件的时候,加载多个
在一个配置文件中引入多个配置文件
Spring注解
SpringIOC注解开发入门
在spring4中,除了引入基本开发包外,还需要aop的包

引入Spring配置文件
src下建立application.xml
引入约束,使用注解开发需要引入context约束
/docs/spring-framework-reference/html/xsd-configuration.html

配置扫描

为方法添加注解
import org.springframework.stereotype.Component;
/**
* @author:index
* @date:2021/12/8
*/
@Component("UserDao") //相当于<bean id="UserDao" class="com.pure.spring.demo1.UserDaoImpl"/>
public class UserDaoImpl implements UserDao{
@Override
public void save() {
System.out.println("Dao中的方法执行了");
}
}
测试类
//注解开发
public void demo2(){
ApplicationContext applicationContext = new ClassPathXmlApplicationContext("application.xml");
UserDao userDao = (UserDao) applicationContext.getBean("UserDao");
userDao.save();
}
注解方式设置属性的值
使用注解方式,可以没有set方法
属性如果有set方法,需要将属性注入的注解添加到set方法
属性如果没有set方法,需要将属性注入的注解添加属性上
SpringIOC注解的详解
component:组件
修饰一个类,将这个类交给Spring管理
这个注解有三个衍生注解(功能类似)
- Controller:Web层
- Service:service层
- Repository:dao层
属性注入的注解
- 普通属性:@Value
- 对象类型属性:@Autowired :设置对象类型的属性的值,但是按照类型完成属性注入, 我们习惯按照名称完成属性注入,所以配合Qualifier使用
- @Resource:完成对象类型的属性的注入,按照名称完成属性注入
- 一般情况下使用value和Resource
import org.springframework.beans.factory.annotation.Autowired;
import org.springframework.beans.factory.annotation.Qualifier;
import org.springframework.beans.factory.annotation.Value;
import org.springframework.stereotype.Service;
/**
* @author:index
* @date:2021/12/8
*/
@Service("UserService")
public class UserServiceImpl implements UserService{
@Autowired
@Qualifier(value = "UserDao")
private UserDao userDao;
@Override
public void save() {
System.out.println("service层的方法执行了");
userDao.save();
}
}
//注解开发
public void demo3(){
ApplicationContext applicationContext = new ClassPathXmlApplicationContext("application.xml");
UserService userService = (UserService) applicationContext.getBean("UserService");
userService.save();
}
bean生命周期配置
- @PostConstruct:初始化
- @PreDestroy:销毁
import org.springframework.stereotype.Service;
import javax.annotation.PostConstruct;
import javax.annotation.PreDestroy;
/**
* @author:index
* @date:2021/12/8
*/
@Service("CustomerService")
public class CustomerService {
@PostConstruct
public void init(){
System.out.println("CustomerService被初始化了");
}
public void save(){
System.out.println("service的Save方法执行了");
}
@PreDestroy
public void destory(){
System.out.println("CustomerService被销毁了");
}
}
Bean作用范围注解:
- scope :Bean的作用范围
- singleton :单例
- prototype :多例模式。
- request :
- session :
- globalsession :

Spring的AOP的XML开发
AOP:面向切面编程。AOP是OOP(面向对象)的扩展和延深,解决OOP开发遇到的问题。
底层实现
动态代理机制
- JDK动态代理:只能对实现了接口的类产生代理
- Cglib动态代理(类似与javassist第三方代理技术):对没有实现接口的类产生代理对象,生成子类对象
JDK动态代理
import java.lang.reflect.InvocationHandler;
import java.lang.reflect.Method;
import java.lang.reflect.Proxy;
/**
* @author:index
* @date:2021/12/9
* 使用JDK动态代理对UserDao产生代理
*/
public class JdkProxy implements InvocationHandler {
//将被增强的对象传递到代理中
private UserDao userDao;
public JdkProxy(UserDao userDao){
this.userDao = userDao;
}
public UserDao createProxy(){
UserDao userDaoProxy = (UserDao) Proxy.newProxyInstance(userDao.getClass().getClassLoader(), userDao.getClass().getInterfaces(),this);
return userDaoProxy;
}
@Override
public Object invoke(Object proxy, Method method, Object[] args) throws Throwable {
//判断方法名是不是save
if ("save".equals(method.getName())){
//增强:
System.out.println("权限校验");
return method.invoke(userDao,args);
}
return method.invoke(userDao,args);
}
}
import org.junit.Test;
/**
* @author:index
* @date:2021/12/9
*/
public class SpringDemo1 {
@Test
public void demo1(){
UserDao userDao = new UserDaoImpl();
//创建代理
UserDao proxy = new JdkProxy(userDao).createProxy();
proxy.save();
proxy.update();
proxy.find();
proxy.delete();
}
}
/**
* @author:index
* @date:2021/12/9
*/
public interface UserDao {
public void save();
public void update();
public void find();
public void delete();
}
/**
* @author:index
* @date:2021/12/9
*/
public class UserDaoImpl implements UserDao{
@Override
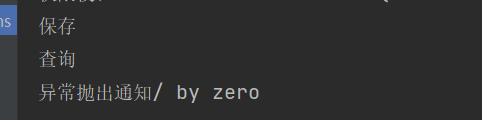
public void save() {
System.out.println("保存");
}
@Override
public void update() {
System.out.println("修改");
}
@Override
public void find() {
System.out.println("查询");
}
@Override
public void delete() {
System.out.println("删除");
}
}
Cglib动态代理
cglib:第三方开源代码生成类库,动态添加类的属性和方法。
Spring的AOP的开发(AspectJ的XML的方式)
创建web项目,引入jar包

引入Spring的配置文件
<beans xmlns="http://www.springframework.org/schema/beans"
xmlns:xsi="http://www.w3.org/2001/XMLSchema-instance"
xmlns:aop="http://www.springframework.org/schema/aop" xsi:schemaLocation="
http://www.springframework.org/schema/beans http://www.springframework.org/schema/beans/spring-beans.xsd
http://www.springframework.org/schema/aop http://www.springframework.org/schema/aop/spring-aop.xsd
http://www.springframework.org/schema/aop "> <!-- bean definitions here -->
</beans>
编写测试类
import org.junit.Test;
import org.junit.runner.RunWith;
import org.springframework.test.context.ContextConfiguration;
import org.springframework.test.context.junit4.SpringJUnit4ClassRunner;
import javax.annotation.Resource;
/**
* AOP入门
* @author:index
* @date:2021/12/20
*/
@RunWith(SpringJUnit4ClassRunner.class)
@ContextConfiguration("classpath:applicationContext.xml")
public class SpringDemo3 {
@Resource(name = "ProductDao")
private ProductDao productDao;
@Test
public void demo1(){
productDao.find();
}
}
编写切面类
/**
* 切面类
* @author:index
* @date:2021/12/20
*/
public class MyAspectXML {
public void checkPri(){
System.out.println("权限校验");
}
}
将切面类交给spring
配置代理
<aop:config>
<aop:pointcut id="pointcut1" expression="execution(* com.pure.spring.demo3.ProductDaoImpl.save())">
<!--配置切面-->
<aop:aspect ref="MyAspectXML">
<aop:before method="checkPri" pointcut-ref="pointcut1">
</aop:before></aop:aspect>
</aop:pointcut></aop:config>

通知:
前置通知:
在目标方法执行之前进行操作
获得切入信息

后置通知:
在目标方法执行之后进行操作(日志记录)


环绕:
在目标方法执行之前和之后进行操作

异常抛出通知:
在程序出现异常的时候,进行的操作(事务回滚)
最终通知:
无论代码是否异常,总是会执行
引介通知:
切入点表达式写法:
- 任意公共方法的执行:execution(public * *(..))
- 任何一个名字以“set”开始的方法的执行:execution(* set*(..))
-
接口定义的任意方法的执行:execution(* com.xyz.service.AccountService.*(..))AccountService
- 在service包中定义的任意方法的执行:execution(* com.xyz.service.*.*(..))
- 在service包或其子包中定义的任意方法的执行:execution(* com.xyz.service..*.*(..))
Spring的AOP的基于AspectJ注解开发
Spring的JDBC的模板
Spring是EE开发的一站式的框架,有EE开发的每层的解决方案。Spring对持久层也提供了解决方案:ORM模块和JDBC的模板。
Spring提供了很多的模板用于简化开发:

JDBC模板使用的入门
- 创建项目,引入jar包
- 引入基本开发包:
- 数据库驱动
- Spring的JDBC模板的jar包

创建数据库和表:保存数据
use spring4_day03;
create table account(
id int primary key auto_increment,
name varchar(20),
money double
);
使用JDBC的模板:保存数据
//创建连接池
DriverManagerDataSource dataSource = new DriverManagerDataSource();
dataSource.setDriverClassName("com.mysql.jdbc.Driver");
dataSource.setUrl("jdbc:mysql://192.168.150.133/spring4_day03");
dataSource.setUsername("root");
dataSource.setPassword("root");
//创建jdbc模板
JdbcTemplate jdbcTemplate = new JdbcTemplate(dataSource);
jdbcTemplate.update("insert into account values(null,?,?)","zhangsan",10000d);
}

将连接池和模板交给Spring管理
<bean id="dataSource" class="org.springframework.jdbc.datasource.DriverManagerDataSource">
<!--属性注入-->
<property name="driverClassName" value="com.mysql.jdbc.Driver"/>
<property name="url" value="jdbc:mysql://192.168.150.133/spring4_day03"/>
<property name="username" value="root"/>
<property name="password" value="root"/>
</bean>
<!-- 配置Spring的JDBC的模板========================= -->
<bean id="jdbcTemplate" class="org.springframework.jdbc.core.JdbcTemplate">
<property name="dataSource" ref="dataSource" />
</bean>
使用Jdbc的模板
引入spring_aop的jar包
import org.junit.Test;
import org.junit.runner.RunWith;
import org.springframework.jdbc.core.JdbcTemplate;
import org.springframework.test.context.ContextConfiguration;
import org.springframework.test.context.junit4.SpringJUnit4ClassRunner;
import javax.annotation.Resource;
/**
* @author:index
* @date:2021/12/23
*/
@RunWith(SpringJUnit4ClassRunner.class)
@ContextConfiguration("classpath:applicationContext.xml")
public class JdbcDemo2 {
@Resource(name="jdbcTemplate")
private JdbcTemplate jdbcTemplate;
@Test
public void demo2(){
jdbcTemplate.update("insert into account values(null,?,?)","lisi",10000d);
}
}
使用开源的数据库连接池

配置DBCP连接池

C3P0的使用
引入c3p0连接池jar包

配置c3p0连接池

抽取配置到属性文件
定义一个属性文件

在Spring的配置文件中引入属性文件

引入属性文件的值

使用JDBC的模板完成CRUD的操作
保存操作

修改操作

删除操作

查询操作


查询多条语句

Spring的事务管理
什么是事务
- 事务:逻辑上的一组操作,组成这组操作的各个单元,要么全都成功,要么全都失败。
事务的特性
- 原子性:事务不可分割
- 一致性:事务执行前后数据完整性保持一致
- 隔离性:一个事务的执行不应该受到其他事务的干扰
- 持久性:一旦事务结束,数据就持久化到数据库
如果不考虑隔离性引发安全性问题
- 读问题
- 脏读 :一个事务读到另一个事务未提交的数据
- 不可重复读 :一个事务读到另一个事务已经提交的update的数据,导致一个事务中多次查询结果不一致
- 虚读、幻读 :一个事务读到另一个事务已经提交的insert的数据,导致一个事务中多次查询结果不一致。
- 写问题
- 丢失更新
解决读问题
- 设置事务的隔离级别
- Read uncommitted :未提交读,任何读问题解决不了。
- Read committed :已提交读,解决脏读,但是不可重复读和虚读有可能发生。
- Repeatable read :重复读,解决脏读和不可重复读,但是虚读有可能发生。
- Serializable :解决所有读问题。
Spring的事务管理的API
PlatformTransactionManager:平台事务管理器
- 平台事务管理器:接口,是Spring用于管理事务的真正的对象。
- DataSourceTransactionManager :底层使用JDBC管理事务
- HibernateTransactionManager :底层使用Hibernate管理事务
TransactionDefinition :事务定义信息
- 事务定义:用于定义事务的相关的信息,隔离级别、超时信息、传播行为、是否只读
TransactionStatus:事务的状态
- 事务状态:用于记录在事务管理过程中,事务的状态的对象。
事务管理的API的关系:
Spring进行事务管理的时候,首先平台事务管理器根据事务定义信息进行事务的管理,在事务管理过程中,产生各种状态,将这些状态的信息记录到事务状态的对象中。
Spring的事务的传播行为
Spring的传播行为
Spring中提供了七种事务的传播行为:
保证多个操作在同一个事务中
- PROPAGATION_REQUIRED :默认值,如果A中有事务,使用A中的事务,如果A没有,创建一个新的事务,将操作包含进来
- PROPAGATION_SUPPORTS :支持事务,如果A中有事务,使用A中的事务。如果A没有事务,不使用事务。
- PROPAGATION_MANDATORY :如果A中有事务,使用A中的事务。如果A没有事务,抛出异常。
保证多个操作不在同一个事务中
- PROPAGATION_REQUIRES_NEW :如果A中有事务,将A的事务挂起(暂停),创建新事务,只包含自身操作。如果A中没有事务,创建一个新事务,包含自身操作。
- PROPAGATION_NOT_SUPPORTED :如果A中有事务,将A的事务挂起。不使用事务管理。
- PROPAGATION_NEVER :如果A中有事务,报异常。
嵌套式事务
- PROPAGATION_NESTED :嵌套事务,如果A中有事务,按照A的事务执行,执行完成后,设置一个保存点,执行B中的操作,如果没有异常,执行通过,如果有异常,可以选择回滚到最初始位置,也可以回滚到保存点。
Spring的事务管理
xml配置
<beans xmlns="http://www.springframework.org/schema/beans"
xmlns:xsi="http://www.w3.org/2001/XMLSchema-instance"
xmlns:context="http://www.springframework.org/schema/context"
xmlns:aop="http://www.springframework.org/schema/aop"
xmlns:tx="http://www.springframework.org/schema/tx"
xsi:schemaLocation="http://www.springframework.org/schema/beans
http://www.springframework.org/schema/beans/spring-beans.xsd
http://www.springframework.org/schema/context
http://www.springframework.org/schema/context/spring-context.xsd
http://www.springframework.org/schema/aop
http://www.springframework.org/schema/aop/spring-aop.xsd
http://www.springframework.org/schema/tx
http://www.springframework.org/schema/tx/spring-tx.xsd">
<!-- 配置Service============= -->
<bean id="AccountService" class="com.pure.tx.demo1.AccountServiceImpl">
<property name="accountdao" ref="AccountDao"/>
</bean>
<!-- 配置DAO================= -->
<bean id="AccountDao" class="com.pure.tx.demo1.AccountDaoImpl">
<property name="dataSource" ref="dataSource"/>
</bean>
<!-- 配置连接池和JDBC的模板 -->
<!-- 第二种方式通过context标签引入的 -->
<context:property-placeholder location="classpath:jdbc.properties"/>
<!-- 配置C3P0连接池=============================== -->
<bean id="dataSource" class="com.mchange.v2.c3p0.ComboPooledDataSource">
<property name="driverClass" value="${jdbc.driverClass}"/>
<property name="jdbcUrl" value="${jdbc.url}"/>
<property name="user" value="${jdbc.username}"/>
<property name="password" value="${jdbc.password}"/>
</bean>
<!-- 配置平台事务管理器============================= -->
<bean id="transactionManager" class="org.springframework.jdbc.datasource.DataSourceTransactionManager">
<property name="dataSource" ref="dataSource"/>
</bean>
<!-- 配置事务管理的模板 -->
<bean id="transactionTemplate" class="org.springframework.transaction.support.TransactionTemplate">
<property name="transactionManager" ref="transactionManager"/>
</bean>
</beans>
AccountDao
AccountDaoImpl
import org.springframework.jdbc.core.support.JdbcDaoSupport;
/**
* @author:index
* @date:2021/12/24
*/
public class AccountDaoImpl extends JdbcDaoSupport implements AccountDao{
@Override
public void outMoney(String from, Double money) {
this.getJdbcTemplate().update("update account set money = money - ? where name = ?", money,from);
}
@Override
public void inMoney(String to, Double money) {
this.getJdbcTemplate().update("update account set money = money + ? where name = ?", money ,to);
}
}
AccountService
AccountServiceImpl
/**
* 转账的业务层的实现类
* @author:index
* @date:2021/12/23
*/
public class AccountServiceImpl implements AccountService {
private AccountDao accountdao;
/**
* from:转出账号
* to:转入账号
* money:转账金额
*/
@Override
public void transfer(String from, String to, Double money) {
accountdao.outMoney(from, money);
accountdao.inMoney(to, money);
}
public void setAccountdao(AccountDao accountdao) {
this.accountdao = accountdao;
}
}
SpringDemo1
import org.junit.Test;
import org.junit.runner.RunWith;
import org.springframework.test.context.ContextConfiguration;
import org.springframework.test.context.junit4.SpringJUnit4ClassRunner;
import javax.annotation.Resource;
/**
* 测试一个转账环境
* @author:index
* @date:2021/12/24
*/
@RunWith(SpringJUnit4ClassRunner.class)
@ContextConfiguration("classpath:tx.xml")
public class SpringDemo1 {
@Resource(name="AccountService")
private AccountService accountService;
@Test
public void demo1(){
accountService.transfer("zhangsan", "lisi", 1000d);
}
}
Spring的事务管理 一类:编程式事务(需要手动编写代码)
配置平台事务管理器
<bean id="transactionManager" class="org.springframework.jdbc.datasource.DataSourceTransactionManager">
<property name="dataSource" ref="dataSource"/>
</bean>
<bean id="transactionTemplate" class="org.springframework.transaction.support.TransactionTemplate">
<property name="transactionManager" ref="transactionManager"/>
</bean>
在业务层注入事务管理的模板
transactionTemplate.execute(new TransactionCallbackWithoutResult() {
@Override
protected void doInTransactionWithoutResult(TransactionStatus transactionStatus) {
accountdao.outMoney(from, money);
//int d = 1/0;
accountdao.inMoney(to, money);
}
});
}
Spring的事务管理:二类:声明式事务管理(通过配置实现)-AOP
XML方式的声明式事务管理
- 第一步:引入aop的开发包
- 第二步:恢复转账环境
- 第三步:配置事务管理器

- 第四步:配置增强

- 第五步:AOP的配置

注解方式的声明式事务管理
- 第一步:引入aop的开发包
- 第二步:恢复转账环境
- 第三步:配置事务管理器

- 第四步:开启注解事务

- 第五步:在业务层添加注解
